
HOW TO SAND WOODEN FLOORS AND FLOORBOARDS: Refinishing Hardwood Floors – Tips from Professional Floor Sanders in Derby
Some of the most frequent questions we get asked are about How To Sand Wooden Floors & Floorboards. So here’s a step by step guide to our Wood Floor Sanding Process.
Refinishing Hardwood Floors – Tips from Professional Floor Sanders in Derby.
You can follow these step by step guide to get the perfect floor restoration job and bring your Wooden Floor to it’s old Glory.
Woof Floor Sanding is a multi-step process. Of course it’s not a rocket science as many will think but this guide will definitely help you understand the process and what to expect from a professional wood floor sanders if you decide to hire them or decided to do it yourself.
Step 1 – Pre-Inspection
 Our pre-inspection allows us to understand your needs, what your expectations are and for us to explain what we do and how we do it. Just as important, we can examine the floor
, see what issues there are with your floor so we are prepared! This will also give us the opportunity to discuss the finish of the wooden floor after sanding as there are a few option for you to choose from – don’t worry, we can offer our guidance and recommendations if it helps.
-
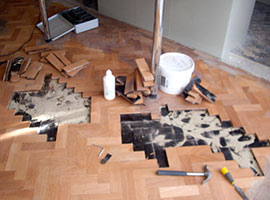
Is the floor solid or engineered? If your floor has already been sanded in the past, can it take any more? You might need to remove a section of the door threshold or skirting board to find out.
-
Which sanding belt or sanding disc grit should be used?. This depends on the condition of the floor. If it’s badly worn and uneven, start with a coarse sandpaper followed by successively less coarse papers. Sandpaper grits for wooden flooring generally range from 16 through to 150 grit, with 16 being the most aggressive and 150 the finest. Find a full range of sandpaper and sanding abrasives here.
Step 2 – Sanding Preparation of the Room for Wood Floor Sanding
We need you to do some work of us before we arrive… If we are sanding your wooden floors, then the room needs to be clear of all furniture and breakable items. Now, we can assist with this the day before we start sanding your wooden floor if you wish, just let us know and we’ll include this as part of the work schedule.
On our arrival our floor sanding specialists will run through with you what is being done before inspecting your floor and skirting boards etc. We’ll then protect where necessary – don’t forget, we’re going to be using wood floor sanders, these are heavy machinery that our technicians use to sand your wooden floors and we don’t want to cause any problems with carpets etc that lead from the room we are working in so we’ll look after these as well.
USEFUL TIPS:
- For complex herringbone pattern floors, sand in the same direction as the light source.
- For Parquet flooring, sand at a 45 degree angle to the pattern.
Step 3 – Vacuuming of your wood floor
We’ll vacuum the entire floor area using industrial vacuum clean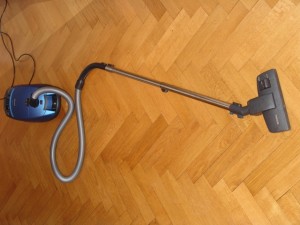 ers to ensure we remove all the loose dirt and dust just so we don’t scratch the floor anymore! We’ll even vacuum around the edges with crevice nozzle to get those bits that get stuck under the skirting or in the corners.
Step 4 – Wood Floor Sanding
A Professional wood floor sanding machine is then used to ‘cut back’ the wood. We don’t use hire machines, these are our own machines from the Pallmann range and are the highest spec in the industry that give far superior sanding results and that’s important to give you a perfect finish.
The process is almost dust free with no horrible smells or odours. Our wood floor technicians spend considerable time methodically overlapping each sanding pass to ensure we remove old seals and coatings, scratches and stains, to leave a perfectly sanded floor.
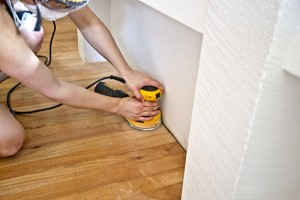
Step 5 – Edges And Corners
Using a variety of special hand tools and edging tools we’ll get into all of the difficult-to-get-at areas and right up close to the edges of the floor blending to a perfect finish.
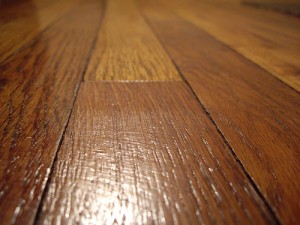
Step 6 – Final Sanding Finish
Here we switch from our belt sander and hand tools to a rotary wood floor sander with a super-fine grit paper that will smooth out any ridges and removes any remaining scratch marks left from the belt sander. This will make your floor look fantastic!
When it comes to choosing wooden floor finishes and treatments there’s a wide range of different options to suit everyone’s style and needs. If you are lacking inspiration and need help, Pinterest can be a great place to start looking and to get those creative juices flowing.
Staining
- Products like Morrells Light Fast Solvent Wood Stains are great for delivering beautiful wood grain definition and an excellent overall colour. Because they’re spirit based and dry pretty fast, it’s best to only apply them to a small area at a time to avoid patches. Take it easy and you should be fine.
- Apply your stain with a brush, rag or special mohair pad. Get rid of any excess with a clean, dry cloth to help the final lacquer finish stick properly.
- Never use an exterior wood stain designed for decking, fencing or garden furniture, since they contain water repellents which also repel water based floor lacquers.
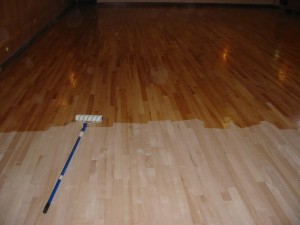
Sealing
- Always choose a water based floor finish that includes a primer/sealer, designed to enhance the wood’s natural colour and reduce the risk of ‘side bonding’, where the planks or parquet tiles get stuck together. If the wood shrinks – which it often does because of atmospheric conditions, central heating and seasonal temperature changes – the lacquer film gluing the wood together cracks, which looks awful.
- Apply your sealer with a t-bar applicator or a short pile mohair roller. Apply the sealer thinly and evenly and don’t put pressure on the roller. Be gentle, applying no pressure, and let the roller do the job it’s designed for.
- When the sealer is completely dry, which usually takes anywhere between two and four hours, you can apply your first layer of water-based topcoat. You don’t need to do any more sanding.
Lacquering
Did you know that varnish and lacquer are the same thing? The trade tend to refer to varnishes as laquers while the public more commonly refer to these products as varnishes.
- Again, use a t-bar applicator or a short haired microfibre roller to spread the product evenly over the floor. Remember not to use any downward pressure, instead letting the roller do its job. If you press down you can form annoying pools of superfluous lacquer.
- Leave 2-3 hours to dry completely, after which you should sand the lacquer with a rotary sanding machine (often called a de-nib) and a 150/180 mesh screen.
- Clean off all the dust and debris and you’re ready to apply the top coat.
Step 7 – Clean & Tidy up
When we are happy that we have got your wooden floor as perfectly sanded as we can we’ll then vacuum and dust all the areas removing any dust contamination that there might be.
Our sanding process is almost dust free so we need to tidy up after ourselves. This also helps to prepare the room for the application of the finish so we can bring the WOW factor back to your floors.
Step 8 – Application of Finish
We have different options when it comes to which finish we apply. An Oil finish or a Lacquer finish. Each one has their unique way of application and their own distinct advantages. We’ll discuss this with you right at the beginning during our pre-inspection.
Step 9 – Final Inspection
Once the floor seal has cured enough to accept light foot traffic we’ll inspect the floor with you to make sure you are totally satisfied with the work we’ve done. Only then will we accept your payment! You’ll need to leave your newly finished wooden floor to cure before you can use it again, usually between 12 & 24 hours depending on the finish we apply.
After sanding your wooden floors, we can also re-colour your floor using our range of oil based colourings. Once we’ve applied the stain we can then seal it in the wood helping to keep a long-lasting finish to your wooden floors.
Floor Sanding and Wood Floor Sanding and Restoration Video:
Add your comment